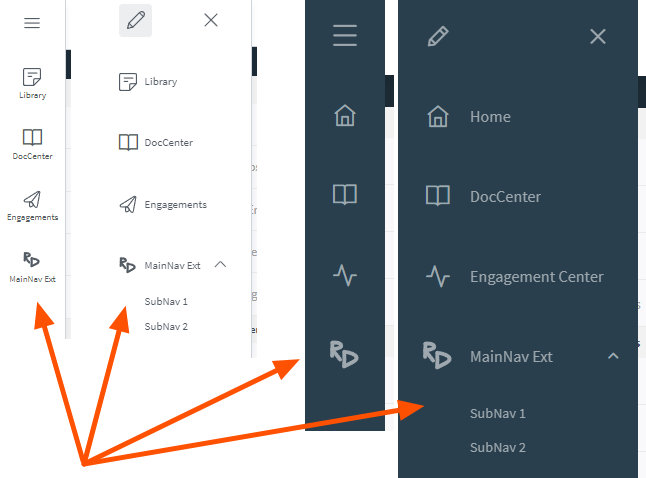
Main Nav
Link to external sites directly from Seismic's navigation pane
Purpose
The Main Nav extension allows you put a linkable icon directly into your Seismic navigation pane. When a user clicks on your icon, Seismic will place the destination page into the Seismic via an iFrame. Although this extension point can be very simple to work with, it also supports a wide range of advanced functionality including:
- Text sub-items
- GET and POST URLs
- Deep linking
- iFramed HTML pages and proxy redirect pages
- Redirect (302) logons to your external pages
Common use cases include:
- Access to external content repositories, such as training materials
- Access to your intranet site
- Access to external web apps or other SAAS platforms

Main Nav extension in New UI & Old UI
App prerequisites
Aside from enabling the extension point and configuring it, there are no additional prerequisites.
How it works
High level flow
- Seismic displays the icon you provide (SVG) in Seismic's navigation bar
- When your icon or subitem is clicked, Seismic displays the linked destination within Seismic's main window
When it's triggered
- Without Subitems, clicking on the icon in the navigation bar will call your URL
- With subitems, clicking on the icon will expose your subitems in a dropdown style, similar to "Settings"
- Clicking on a subitem will load that specific URL into Seismic's main window
- With deep linking, clicking on a piece of content that is associate with your item or subitem will
Security and authentication
It is recommended to validate the Signing Secret in the POST request that Seismic is making
How to configure
Configure the Main Nav extension
- Add Main Nav to your application as described here
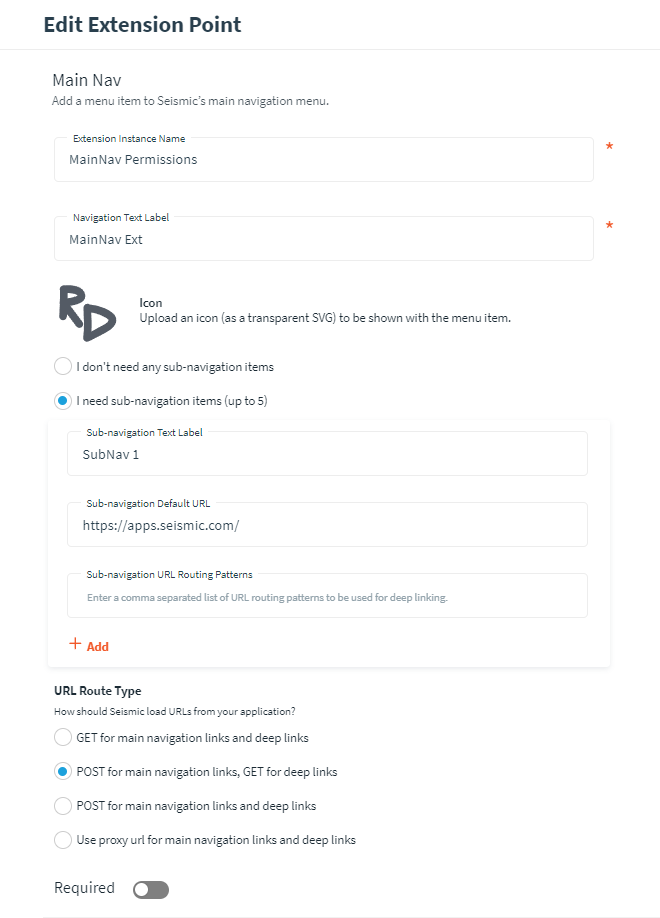
- Configure the fields for this extension, please refer to the table below for definitions and notes
- Make sure to enable the extension point and click Save Changes

Main Nav configuration settings
| Field name | Data type | Description | Notes |
|---|---|---|---|
| Extension Instance Name | string | The name by which this extension point is identified | Visible to tenant admins that install your app |
| Navigation Text Label | string | The label that is put below or to the left of your icon | |
| Icon | svg | The vector image that gets embedded in Seismic's navigation bar | Refer to Visual Recommendations below |
| I don't need any sub-navigation items | radio button | When selected, no sub items are available | |
| Main Nav URL | url | The URL that is called when a user clicks on your icon | |
| Deep link routing pattern | comma separated urls | The patterns by which we can identify when URL content should be displayed in the context of your Main Nav icon | Use "" to indicate wildcards. Supports multiple values. Example: https://.mySRS.com/training/, https://.mySRS.com/courses/, https://.mySRS.com/coaching/* |
| I need sub-navigation items (up to 5) | radio button | When selected, you are able to add multiple entries for sub items to your icon | |
| Sub-navigation Text Label | string | The label that is displayed in Seismic's navigation bar | |
| Sub-navigation Default URL | url | The URL that is called when a user clicks on this subitem | |
| Sub-navigation URL Routing Patterns | comma separated urls | The patterns by which we can identify when URL content should be displayed in the context of this navigation subitem | Identical functionality as the Deep link routing pattern field |
| URL Route Type | radio button | The type of the HTTP call that seismic will make to your Main Nav URL or Sub-Navigation Default URLs | ‘Main navigation links’ is the URL that's loaded into Seismic via iFrame. 'Deep Links' are URLs from your application that are exposed other parts of the Seismic application |
| The proxy url to use for main navigation links and deep links | url | Use this field if you want to redirect to another site to be iFramed within Seismic | Only available when URL Route Type is set to User proxy url. This adds additional query parameters to the call, please refer to the section below on Route Types and Proxy URLs |
URL route types
Get URL Route Type
This is the most simple configuration. Your URL will simply return the HTML that should be displayed in Seismic. iFraming must be allowed on your site.
POST URL Route Type
Seismic will delivery a payload to your endpoint which allows you to do things like validate the call and capture details of the tenant, user, and app.
The POST call from Seismic will include the app's signing signature with the label "x-seismic-signature"
{
"UserId": "1234431f-4eee-42d5-9141-e56c5b00b391",
"UserEmail": "[email protected]",
"Language": "en-US",
"AppId": "00007df8-9ebb-487a-98b8-471ececc5f46",
"AppName": "My Test App",
"Tenant": "mytenantname",
"TenantId": "11181086-49d3-495b-b063-2c35319a30b5",
"RequestId": "53a712d3-66db-4664-96c3-67d36cb89fd6",
"Version": "1.6.5",
"Timestamp": "2022-05-18T16:17:30.8724593Z"
}
Your response to Seismic should be the contents you expect to see iFramed within Seismic's main window, either as HTML or as a redirect URL
Proxy URL Route Type
Seismic will add some valuable query parameters to the endpoint that you provide.
- url - the url requested either via a deep link or via the user clicking from the main nav menu or submenu items.
- userId - the id of the user who requested the url
- email - the email address of the user
- tenant - the tenant of the user (human readable)
- tenantId - the id of the tenant
- timestamp
- signature - the whole proxy url plus query params will be HMAC-SHA265 hashed using the signing secret. This will be stringified and appended as a query param.
Sample:
https://mydomain.com/myproxy?url=[requestedUrl]&userId=[userId]&email=[email]&tenant=[tenant]&tenantId=[tenantId]×tamp=[ISO 8601]&signature=[sig]
This is a good choice if you are using an API based call such as our Search Extension or Related Training Extension. You can have your proxy access your same database where you have matched your external user to the Seismic user and then the user would only need to login once to your system. By returning a 302 redirect to the url with a cookie, the user doesn’t need to login to the web side of your application.
Proxy domain vs Destination domain
If your proxy is not on the same domain that the requested/final url that the user is trying to access you’ll need to redirect twice, once from the proxy to something within the correct domain and then to the final url with the cookie
Here is a sample of how you can validate the signing signature from a Proxy URL POST with Ruby
require "openssl"
require "base64"
require "time"
require "addressable"
def shared_template
@template ||= Addressable::Template.new("https://mysrs.com/myProxy/{?url,email,userId,tenantId,timestamp,signature}")
end
def shared_secret
"aacfd657bd324f91a418b4c3766d492682538752a1684a3280beb3733c35aa0b"
end
def verify_url(url)
uri = Addressable::URI.parse(url)
args = shared_template.extract(uri)
incoming_sig = args["signature"]
url_without_sig = url.gsub(/&signature=.*/, "")
computed_sig = OpenSSL::HMAC.hexdigest("SHA256", shared_secret, url_without_sig).upcase
matches = incoming_sig.eql?(computed_sig)
puts "sig matched? #{matches}"
if matches
ts = Time.parse(args["timestamp"])
recent = ts > Time.now - 30 * 60
puts "ts recent? #{recent}"
if recent
puts "Creating cookie for email=#{args["email"]}, domain=#mysrs.com. Sending user to #{args["url"]}"
end
end
end
url = generate_url("https://tenant1.mysrs.com/123");
verify_url(url);
Visual recommendations & guidelines
Icon format
- Please use an SVG (vector graphic) for your icon
- It is recommended to use a transparent background
- You can set your canvas size to 25x25 for design & previewing purposes, but the size of your SVG canvas is not important to functionality
Icon line color
If you want your icon to blend in naturally with the other icons, please follow the guidelines below
- Seismic's icons are line based vectors. We do not currently use shapes or colors in our UI iconography
- If your tenant is using Seismic's new UI (white background in the navigation bar with dark gray icons), you will want your to use the color code #535B64 (R: 83, G: 91, B: 100)
- If your tenant is using Seismic's original UI (dark blue/gray background with light gray icons) in the navigation bar with gray icons), you will want your to use the color code #9EA8AE (R: 158, G: 168, B: 174)
Item character length
Seismic's navigation does not use a Monospace font, so the recommendations below are impacted by wider or more narrow characters. Please test your application for readability.
- The label on an icon without subitems should typically be less than 11 characters
- When subitems are present, it is still recommended to keep the label less than 11 characters, however when a user clicks on your icon they can see a larger name above the subitems. You can typically display up to 14 characters without overlap on the dropdown arrow
Subitem character length
- The label on a subitem should typically be less than 20 characters. As above, this can change slightly due to character width
Additional best practices
Limit the scope for each sub-nav item
Each item should serve a clear and distinct purpose. For SRS applications that have a coaching component, we recommend separate sub-nav items for “Training” and “Coaching”. For SRS applications without a coaching component, we recommend using a single main nav item without any sub-nav items.
Simplify UI for iFrames
For the best user experience, we recommend providing iFrame URLs that strip out peripheral content that can distract the user.
- Remove navigation menus that aren’t needed given the scope of the nav item
- Remove any unneeded headers and footers
- Remove search bars if your users are searching for content within Seismic via the Search Extension
Troubleshooting
- Ensure your Main Nav icon is in an SVG format
- Ensure your URLs allow iFraming
- Ensure the extension point is enabled within your app
- If using POST or Proxy URLs, ensure your app is configured with a signing secret via the Basic Information tab
Related Documentation
Updated almost 3 years ago