Authentication - high level & demo
You're probably ready to get started, but there's one more important hurdle that you need to understand to get started. Our APIs require that you have access to the Seismic platform and you pass these checks by passing in your authentication details along with your API call. There are different ways to do this but for the sake of brevity and relevance, we're just going to focus on the way Seismic does it.
If you're looking for more technical details, check our our Authentication Overview page. If you're just looking for a place to get started, keep reading!
OAuth 2.0 & Access Tokens
Seismic uses an industry standard method of authentication called OAuth 2.0. This technology keeps authentication completely separate from other functionalities and doesn't send sensitive details around. Your request to access the service is granted by providing specific information to the authorization sever and are then given a type of Access Token. Specifically for Seismic, we use a Bearer Token
This access token is a big long string of characters that contains a lot of information like user details, tenant details, allowed permissions, and an expiration time.
How do I get an access token
When creating a full-fledged integration or app, you'll want to choose the right type of authentication for the workflow of your app. However, for the purpose of just getting started, we've got this handy tool below:
- Type in the tenant name that you want to gain access to then click the big blue button Select Tenant
- In the Step #2 box, select the Scopes that you want. Check the box for seismic.configuration.view
- If you use SSO to access the tenant, click Get Token
- If you use a Seismic username & password to get access the tenant, click Direct login
- After you complete authentication then the token is generated. It's that big blob of numbers and letters. Click the button for "Copy To Clipboard" and now you are ready to use your token!
OK, so where can I use the token
As mentioned in the previous lesson we'll be passing in our bearer token in our API request header. Without needing any special applications, you can use your token right here in the dev portal.
When we were requesting our token, we selected the scope seismic.configuration.view which gives us access to a variety of API calls, including Get a list of all teamsites. This is a great endpoint to start with, as it is very simple and the data you get here will be used in dozens of other calls.
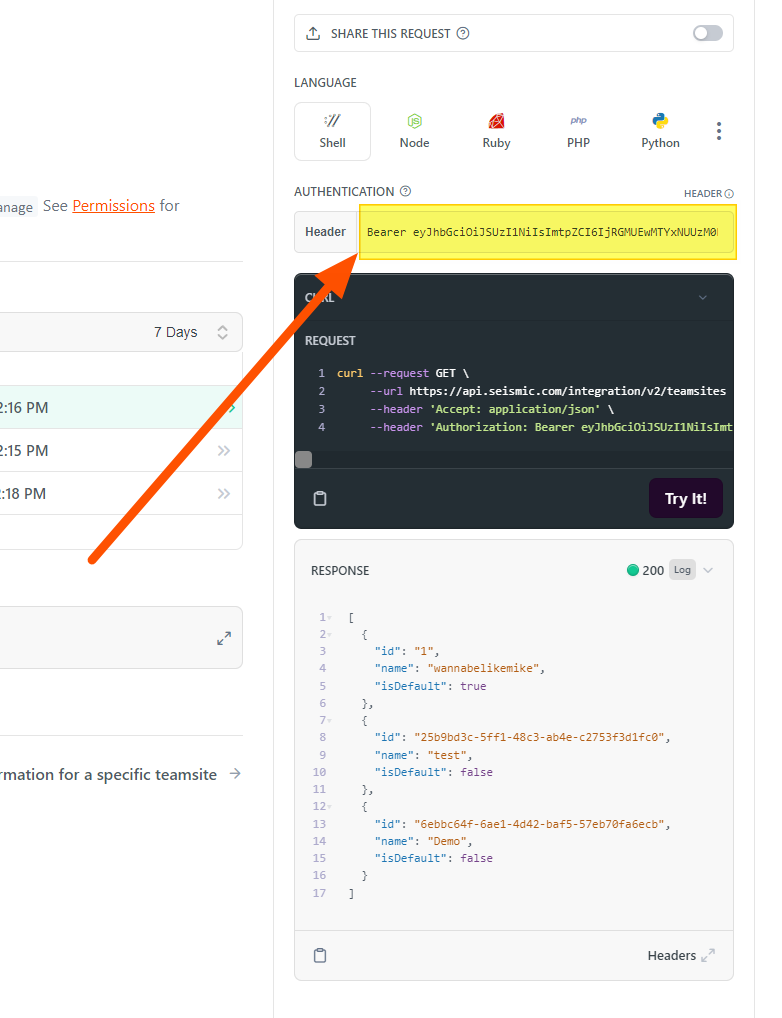
On the right side of the API documentation page below, there is an authentication section and a sample code window. In this box you'll type in "Bearer " with a capital B and a space at the end, then paste in your token. It should look like this

Add your Bearer token here!
Well, try it already!
Clik the "Try It!" button at the bottom of the dark gray code window and your API response will appear in the light gray response box, just like in the screenshot above. It should contain the list of teamsites that are available on your tenant and their IDs.
Congratulations you've executed your first Seismic API!
What if it didn't work?!
If your API didn't succeed, take a look at the response and it should point you in the right direction.
If you got a message that said "statusCode": 401, "message": "Unauthorized Request" then you did not add your Bearer token in correctly. Make sure you type in "Bearer" with a capital B and then paste in your entire access code into the window.
Updated over 3 years ago